
Today we begin another "winter" series of beading. The first product in the series will be a snowflake out of seed beads and bugle beads. It can be a beautiful Christmas decoration for your home as well as a perfect gift to your friends and family.
We will need:
- size 10 seed beads of two colors (I used white and grey colors);
- six seed beads of a large size (I used size 5 seed beads of an amber color);
- size 3 bugle beads (I used silver color);
- 140 cm of wire 0.3 mm thick.
Step 1:
String one large seed bead onto the wire and place it at a short distance from one of the wire’s ends.

Take the shorter end of the wire and pass it through the bead from its reverse side. We’ve got a loop of wire around the bead.

Tighten the wire. So we fix the bead on the wire. We need it to make sure that the bead does not move during the weaving process. As soon as we finish the weaving we will unravel this loop.

We make further weaving using only the longer end of the wire.
Step 2:
String 2 bugle beads and 4 grey seed beads onto the wire.

Hold the last 3 seed beads and pass the wire in the opposite direction through the first seed bead of the recent set and through one bugle bead closest to that seed bead.

Move the set closely to the very first large bead and tighten the wire.

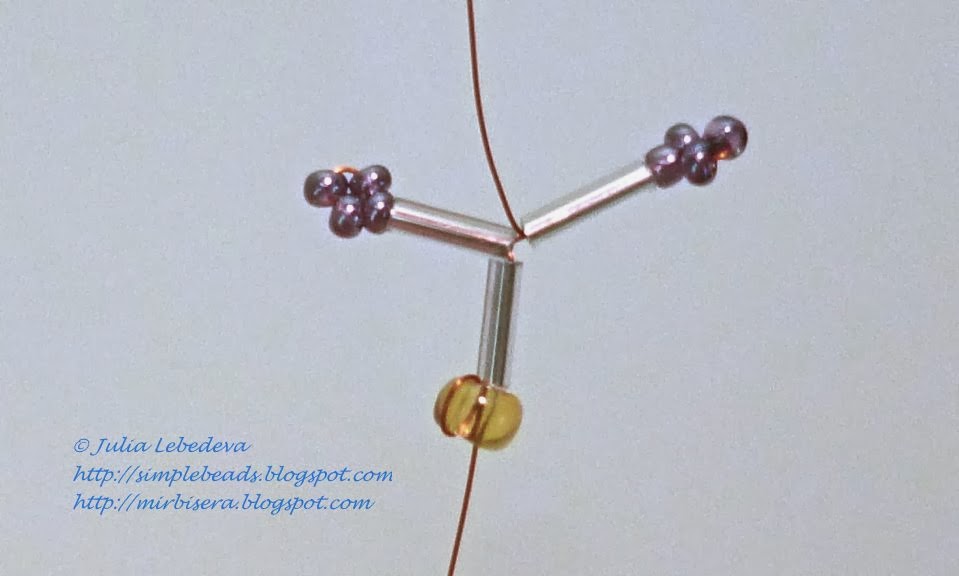
Step 3:
String 1 bugle bead and 4 grey seed beads onto the wire.

After that pass the wire in the opposite direction through the first seed bead of the recent set and further through one bugle bead.

Move the set closely to the product and tighten the wire. We’ve got the first tier of the snowflake’s beam. Its characteristic feature is bugle beads with "knobs" of gray seed beads. These bugle beads are like needles positioned perpendicular to the beam of snowflake, and they are directed in opposite directions from each other. Remember these “knobs”, they will be needed later. When we weave subsequent beams of the snowflake, these “knobs” will be used for connecting the needles of adjacent beams. Finally, when we make all the six beams of the snowflake the needles will form a continuous circular perimeter.
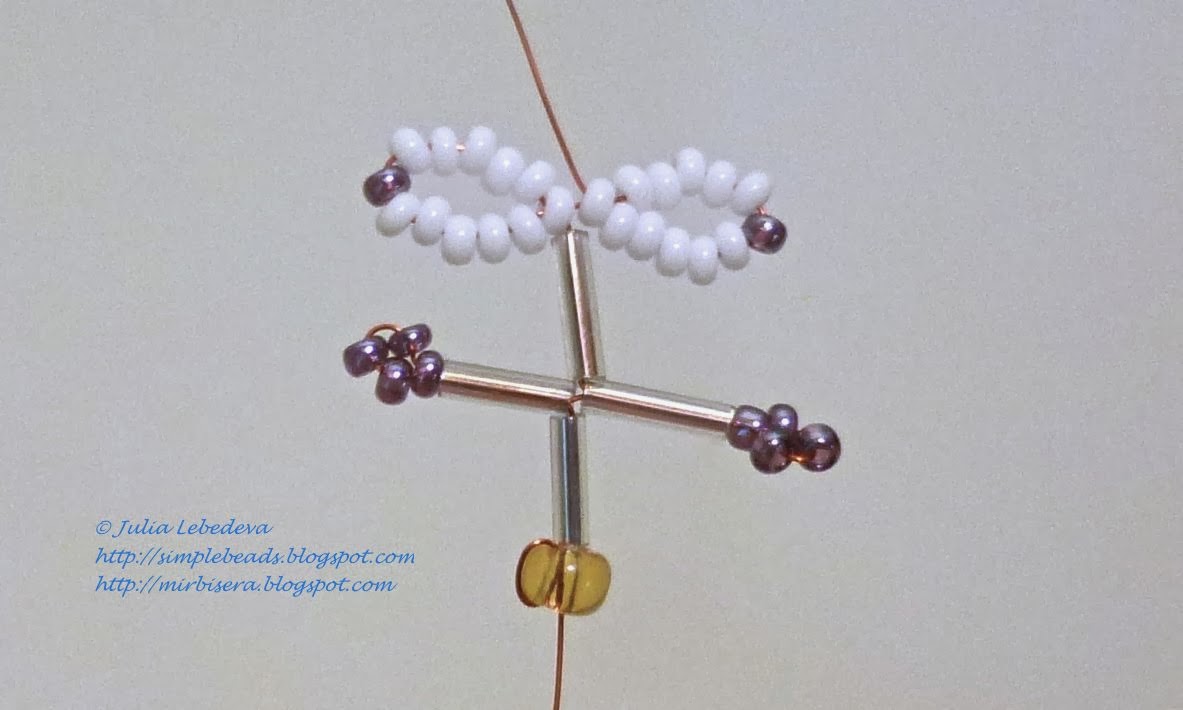
Step 4:
Keep on weaving the first beam of the snowflake. Its second tier consist of one bugle bead and two beaded loops. For them we string onto the wire one bugle bead, and then 6 white, 1 grey and 5 more white seed beads.

Pass the wire backwards through the first seed bead of the recent set.

Move the set closely to the first tier of the beam and tighten the wire. We’ve got the first beaded loop.

For the second loop of the current tier we string onto the wire 6 white, 1 grey and 5 more white seed beads.

Then pass the wire backwards through the first seed bead of the recent set.

Move the set closely to the first loop and tighten the wire. We’ve got the second beaded loop and the second tier of the beam as well.
Step 5:
Next, closely to the second tier we should make the third one. It is the same as the second tier, consisting of one bugle bead and two beaded loops. Please don’t forget to string a grey seed bead among white seed beads for each beaded loop.

Step 6:
As soon as we’ve made all three tiers, we should make one more beaded loop at the top of the beam, and then withdraw the wire to the base of the beam. To do that we string 6 white, 1 grey and 5 more white seed beads onto the wire,

pass the wire backwards through the first seed bead of the recent set

and immediately after that pass the wire through three bugle beads that make up beam’s axis.

Gently pull the wire - the first snowflake’s beam is finished.

Step 7:
For the beginning of the second beam string onto the wire one large seed bead and two bugle beads.

Step 8:
Now we should connect the second beam to the first beam at the level of the first weaving tier. To do that, find the “knob” at the closest needle of the first beam and pass the wire through its seed bead which is closest to the bugle bead of that needle.

Then pass the wire backwards through the latest stringed bugle bead at the second beam


and tighten the wire. The needles of two beams have been connected together by the “knob”.

Step 9:
Keep on weaving the second beam. To make the second needle with “knob” we should repeat the sequence of actions, as in Step 3.

To finish the second beam we should repeat the sequence of actions, as in Steps 4, 5 и 6.

The next three beams of the snowflake are the same as its second beam. For the each new beam we should repeat the sequence of actions, as in Steps 7 и 8, and then Steps from 3 to 6.

The last - sixth - beam of the snowflake is almost the same as the previous beams. The only difference is that both of its needles at the first tier don’t have “knobs”.
So weave the sixth beam: first, repeat Step 7 stringing onto the wire one large seed bead and two bugle beads.

Then repeat Step 8 - connect the first needle of the 6th beam together with the 5th beam.


After that string one bugle bead onto the wire - for the second needle of the current beam.

Next, repeat Step 8 again, at this time connecting the second needle of the 6th beam together with the 1st beam of the snowflake.


To finish the sixth beam we should repeat the sequence of actions, as in Steps 4, 5 и 6.

Now we should unravel the wire loop around the first large bead in the center of the snowflake. Then, to stiffen the central part of the snowflake, pass the longer end of the wire (the one that we used for weaving) through all the large seed beads circumferentially.

After that tighten the wire so that all the large seed beads form a tight circle in the center of the snowflake. Then twist together both ends of the wire and cut them off leaving only a small tip. This wire tip will hide itself between the large seed beads and it will not be seen.

Straighten the beams - the snowflake is finished!
I remind you that there are more tutorials how to make snowflakes at our website.
By making different kinds of snowflakes and also by using different colors of beads and bugles, you can create a truly fabulous beaded blizzard!
P.S. Don't want to miss new tutorials? Subscribe for email notifications of site updates!
If you like this tutorial, share it with your friends on social networks using the buttons below the post.
No comments:
Post a Comment